 Ever since seeing this post over at mel stampz, I have wanted to try making my own embossing template. The new set “Central Park” from SU! had the perfect stamps to give this a try with an outline stamp of a stem and 3 leaves and a filler stamp for the the outline.
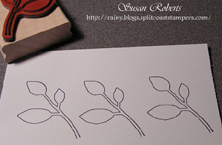
To make the template, I stamped the outline image 3 times on SU!’s Whisper White card stock and cut them out. (A light weight cardboard could also be used. However because of the tighter cutting required for this particular image, I opted to use card stock making it a bit easier to get into those more difficult areas with my scissors.)

Next I glued the 3 pieces together and trimmed any overlaps that occurred from the images not being cut out exactly the same. This is important in order to get a deep, crisp and clean embossed line.
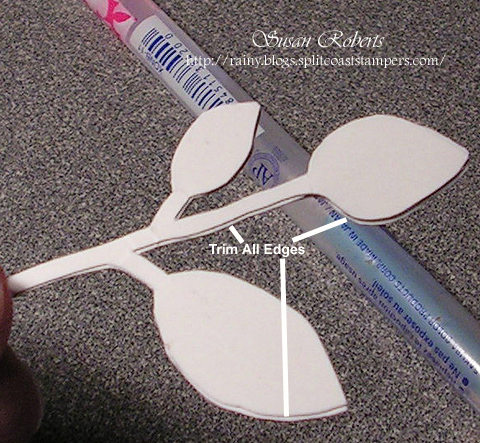
Once the template was finished I ran it through my Cuttlebug. Be sure to use an embossing mat on the opposite side of the card stock from the template. This single image is actually the reverse of the stamped image.
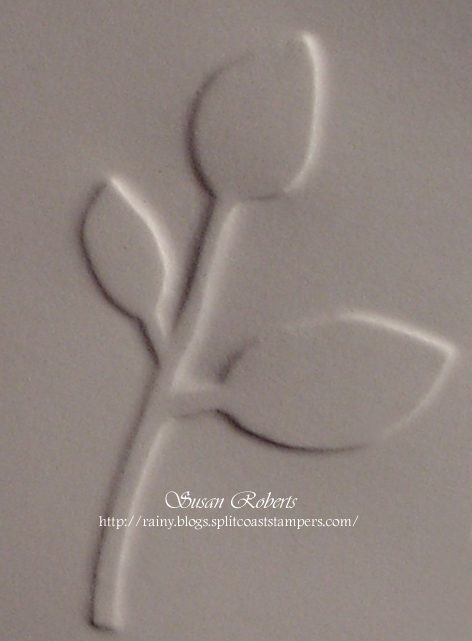
With this template, it can be run through in either direction!
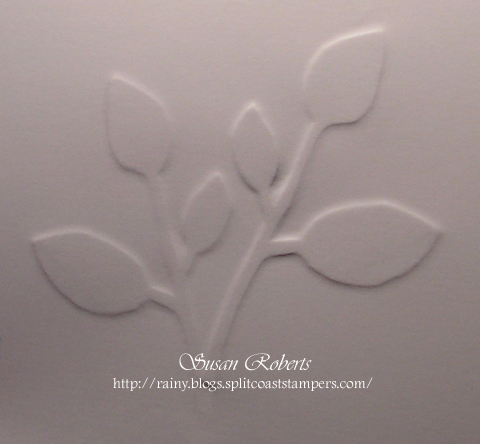
You can also use the positive or negative side of the embossed image. Here I have used my stamp-a-ma-jig to make sure the filler stamp was positioned right over the embossing.
The positive: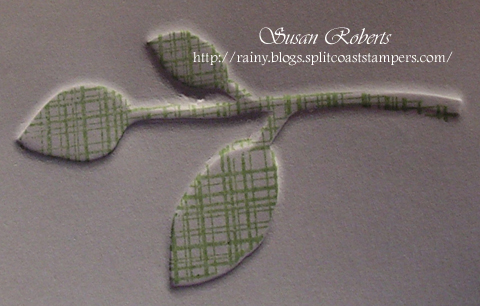
The negative: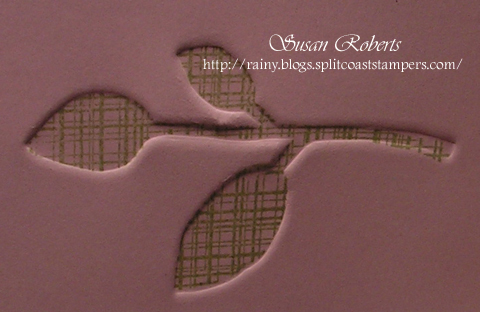
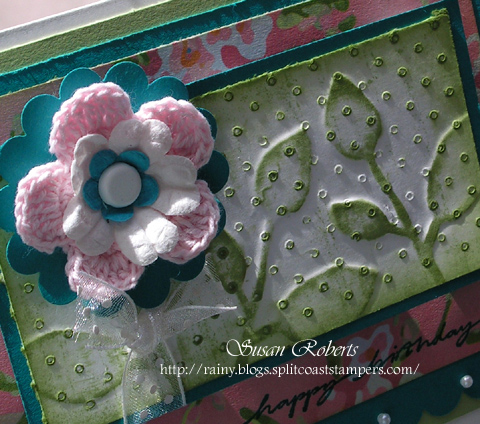
I added some faux stitching around the negative embossed image.

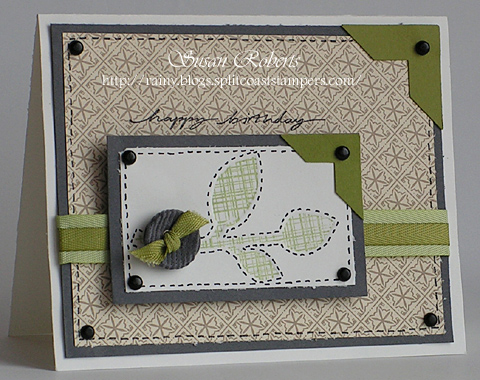
Here is the finished card.
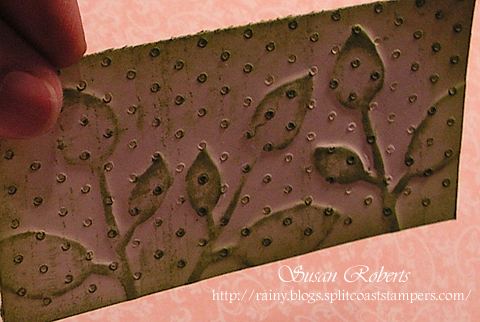
Well I was having so much fun that I decided to play some more. This time I started by embossing my card stock with the Swiss Dots embossing folder before using my Central Park template. Just for some embossing interest, I used the negative embossed Swiss Dots for the positive Central Park embossed image. And rather than using the filler stamp for the leaves, I distressed the embossing by rubbing my ink pad over the entire image several times.
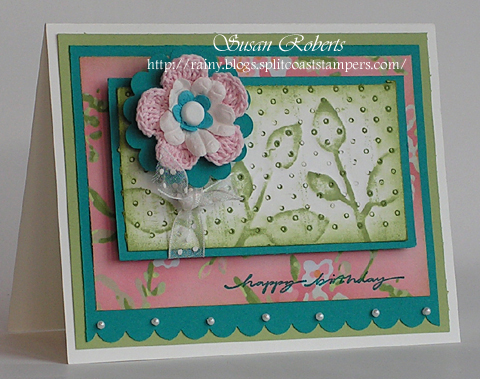
And the finished card… TOO FUN!!!
 Hope everyone has a wonderful and beautiful Easter!
——————————
Masculine Card: (SUO)
Stamps: “Central Park” and “On Your Birthday”
Papers: Whisper White, Basic Gray, Old Olive, and DSP “Bella Bleu”
Inks: Certainly Celery and Basic Black
Accessories: Old Olive 1/4″ Twill Ribbon, Certainly Celery Twill Ribbon, Basic Gray Corderoy Button, Brads, Photo Corners Punch
Feminine Card:
Stamps: SU! “Central Park” and “On Your Birthday”
Papers: SU! Whisper White, Taken with Teal and Certainly Celery; DCWV Designer Paper
Inks: SU! Certainly Celery and Taken with Teal
Accessories: SU! Fleurette, Scallop Circle Punch, Scallop Border Punch and Brad; Cuttlebug Swiss Dots Embossing Folder; Primas; Flatback Pearls; May Arts Ribbon


Both of your cards are sooooo pretty, Susan!! What a great idea for the embossing too!! Thanks for sharing!!
Thanks for that wonderful idea on embossing. I never would have thought of that but for sure I will give it a try. TFS.
Hope you have a wonderful Easter. Pat
Oh my WORRRRRRRD, what a SUPER COOL idea!!! Love the look of this, especially with that Central Park stamp. Awesome!!
I am SO impressed – LOVE this – TFS! I’ll have to try this over the weekend! Happy Easter!
Oh My Gosh, I need to pick my jaw up off the floor! What an innovative idea! The possibilities are endless for this technique! Thanks for sharing your wonderful idea and your beautiful sample cards! Amazing!!
Now aren’t you the clever girl, Susan…I LOVE your design!!!!! Both cards are sooo beautiful…I am going to try this tonight!!!!!
Wow! This is such an awesome technique. Your cards look amazing. TFS!!
Wow,Susan this is fantastic and beautiful…J Laura
What a fabulous technique Susan, I hadn’t thought of creating my own templates from stamped images! Your cards are gorgeous!
Thanks for sharing your projects. I wish a very Happy Easter to you and your family.
OUUUUUUU! What brilliant pointers. You ROCK. I love your results. Makes me want to make more now that I can use your brilliant idea of layering cardstock. Thanks for sending the inspiration right back to me. Your projects are all divine! :O)
Ohhhhhhhh, so, so pretty. I can’t take my eyes off of the pink and blue card.
Susan – these are simply fabulous! I adore your use of the negative embossing.
Susan, the second one is my favorite…isn’t Mel just the best? Thenks for the up close tutorial…so many of us are visual and I know how much time these take. Blessings!
What a fabulous idea, Susan, and such beautiful results!
OH-MY-GOSH!!!! These are so beautiful! You have such talent. I enjoy every post! Keep up the great work.
Oh Wow this is such a neat idea and I love the background on the last card, very cool results, tfs!
Wow! What a wonderful way to use stamps!
Wow … this is awesome! Thanks for all the great info on the how-to’s!! This is so creative … way to go my friend!!! Hope your Easter was delightful!!
Wow! That is a SUPER COOL IDEA!!! I LOVE IT!!! Thank you so much for sharing and showing it!!! You are amazing, Susan!!!
Love your cards!!!
What a very cool technique! Beautiful card!
Wow, that’s fancy! And the finished cards are great!
Wow, is that interesting. What a really cool technique and your card as an example is wonderful
wow! what a fabulous technique. thanks for the tutorial! your cards are beautiful!
What a wonderful idea and fabulous tutorial – I love this!!! So clever and that crocheted flower is FAB!!! One great project — thank you so much for sharing the how-to!!!
Love this card, great idea to make your own leaf embossing. Would this work in the big shot?
Spring has always been a people revel in the season, all the recovery, color brightly, full of hope of life. Christian Louboutin is also seasonal occasion was the launch of those colorful download. Saturated am full, tender lips of bright colors, so that the mood becomes brighter. However, the single Chromic and Christian Louboutin Pumps can not meet the designer’s ambition, then, try to mix and match cheap Louboutin Slingbacks different Chromic, some large blocks of color of stitching, while others are like rainbow stripes. In short, color has been fully utilized, as the foot of the spring to wear louboutin shoes