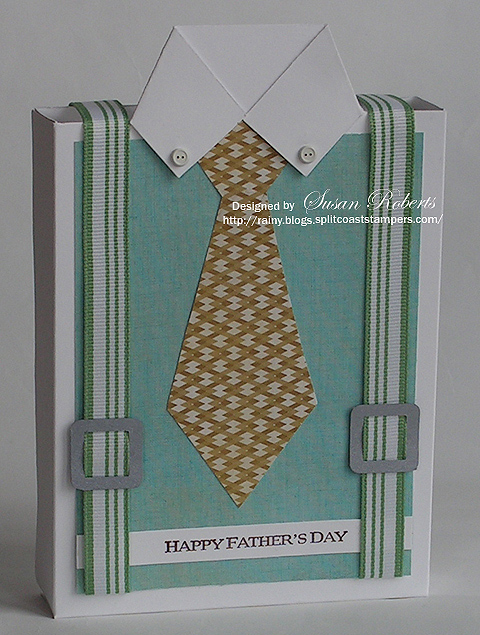
For Father’s Day last year I designed a shirt and tie card. Well using this same idea, I’ve created a shirt and tie tote. This will be filled on Father’s Day with a sweet surprise. However, this tote will comfortably hold 3 or 4 moderately embellished A2 sized cards with envelopes, if you’d rather that than chocolate! ![]()
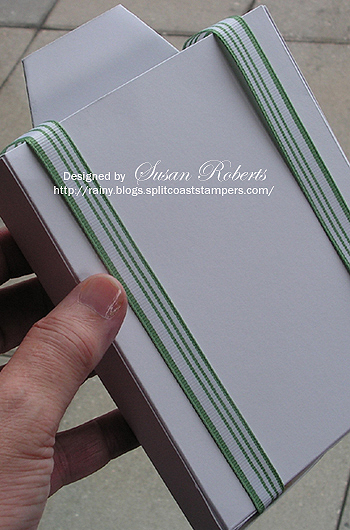
I love suspenders, but I’ve never been able to convince my DH to wear them. Wonder if he’ll even notice them on this little creation. Kinda hard to miss ’em? They carry all the way down the back of the tote as well.
Following is a tutorial for the tote, but first I wanted to announce the winner of my Sketch Challenge. I was SO excited that some of you played along!!! How cool is that. I didn’t use a random generator this time, but instead just wrote your names on some slips of paper, put them in a bowl, closed my eyes and picked one. Congrats, Carol L! I’ll get that gorgeous Graphic45 paper out to you asap!
INSTRUCTIONS FOR A FATHER’S DAY TOTE
Step 1
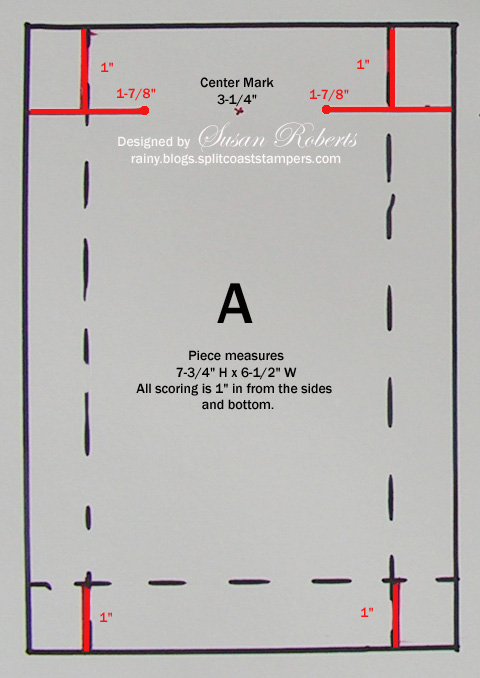
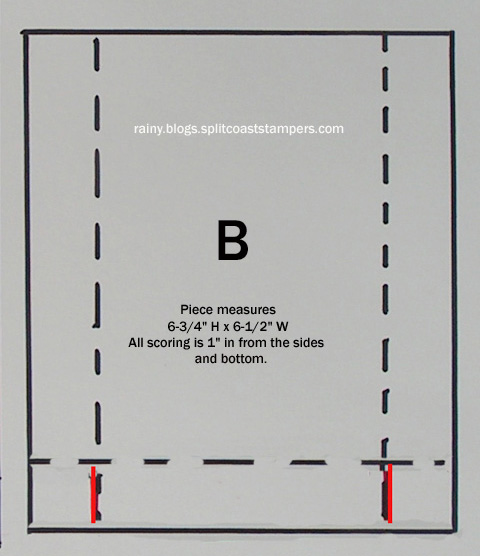
Cut 2 pieces of cardstock A and B.
Piece A = 7-3/4” x 6-1/2”
Piece B = 6-3/4” x 6-1/2”
Step 2
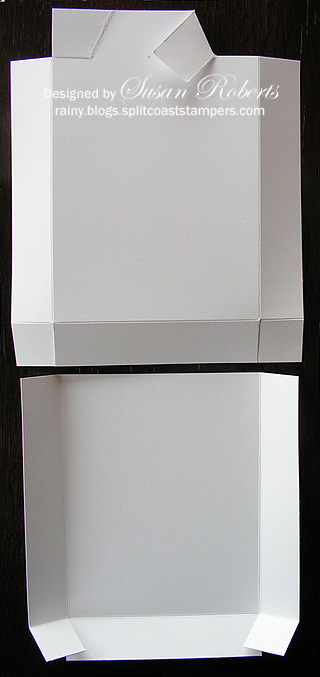
Piece A – Score in 1” from both long (7-3/4”) sides. Score in 1” from one of the short (6-3/4”) sides.
(This side will now be referred to as the bottom of Piece A and the opposite short side will be referred to as the top.)
Piece B – Score in 1” from both long (6-3/4”) sides and 1” from one of the short (6-1/2”) sides.
(This side will now be referred to as the bottom of Piece B.)
Step 3
Piece A – Measure down 1” from the top and 1-7/8” from both sides and lightly mark this spot. From 1” down on the sides, cut in 1-7/8” to that mark. Cut down 1” from the top on both score lines. This will completely cut away a 1” square from both corners of the top. Cut up 1” from the bottom on both score lines.
Piece B – Cut up 1” from the bottom on both score lines.
Cutting lines are in RED.
Step 4
Follow the instructions on THIS TUTORIAL to make the collar and tie. Note, however, that the “center” should be marked at 3-1/4” (not 2-1/8” as given in Step 3 of the card tutorial.)
Decorate and embellish each piece as desired.
Step 5
Assemble the tote by folding all the scored lines in the same direction and towards what will be the inside of the tote. Adhere A and B together on the overlapping side and bottom pieces. Make sure that Piece A is on the outside of Piece B.
Happy Crafting!
——————————
Stamps: Inkadinkado Happy Father’s Day
Papers: PTI Select White; SU Silver; My Mind’s Eye “Indie Chic ‘Nutmeg'”
Inks: SU Chocolate Chip
Accessories: Button Brads, Grosgrain Ribbon; Buckle Punch



























Oh my gosh, I love how you came up with this adorable treat holder for dad! I love the suspenders done up with ribbon too! This is just plain fun for a guy 🙂
I’m so excited that I won the sketch challenge – thank you for your generosity!! 🙂
What a perfect father’s day treat! Just the right paper for the tie and I love the suspenders, too.
Howdy, Susan! I’ve been a bit busy with the new little guy at our house, as well as a major sewing project so I’ve been MIA for a few months. Going to have to take a look-see to what else you’ve been up to. Especially what your sketch was! The ‘Shirt and Tie’ tote is adorable!
My 1st DH wore suspenders, and so did #1 son. (Belts were never small enough!) Second DH and #’s 2&3 sons are belt people, though. Unless they are playing firefighter, that is! =))
Totally adorable, Susan!!
What a great idea for Father’s day. I will be going out to my craft room from http://roomstogrowusa.web12.hubspot.com/hobbyrooom/ and making a couple of those up. Thanks for the step by step tutorial.
Hi Susan! This is pure genius! I love it!! Sorry I didn’t have time to play along with your sketch contest. With the end of the school year, I haven’t been doing much stamping. I do have a card in mind for the sketch and promise to share it with you when I do!
Absolutely fantastic! Amazing creation, Susan. Your husband will love this.
This is so awesome Susan!! Thanks for the tutorial as well. Hope you do another sketch challenge again. That was fun.
Love that tote. Thanks bunches for the tutorial. Here in Portland we have grey skies. I hope up there is full of sunshine for you. Have a good weekend.
very cool and neat design!
Wow! This is so fabulous! I love it all, but those suspenders are just awesome! Thank you for so generously sharing the tutorial!
I love your choice of paper for the tie and the suspenders are fabulous!! 🙂 And what a fun gift idea!!
very cool tote! love the button brads and suspenders!
Way 2 cool Susan!!~
How COOOOOOOL! Thanks for sharing instructions, too!
What a fabulous Father’s Day project, Susan…I looove this!!!! Thanks for the instructions…I’ll be making a few of these!!!!
[…] the shirt and tie card HERE. I also have a template to make the shirt and tie into a little tote HERE. Hope you’ll check them out. They are easy and super fun to […]