..I know heaven must exist.”


Kate Meets Little Sister

My fourth granddaughter was born a couple of days ago.  I have been in Arizona this past week for the blessed event.  As of last night when I boarded the plane back to Seattle (and wishing that I would have made my stay just one day longer), this sweet little girl’s parents still had not given her a name.  They have a few favorites but wanted to see her and meet her before deciding on the final one.  Well whatever they do end up naming her, she is pure heaven to grandma.

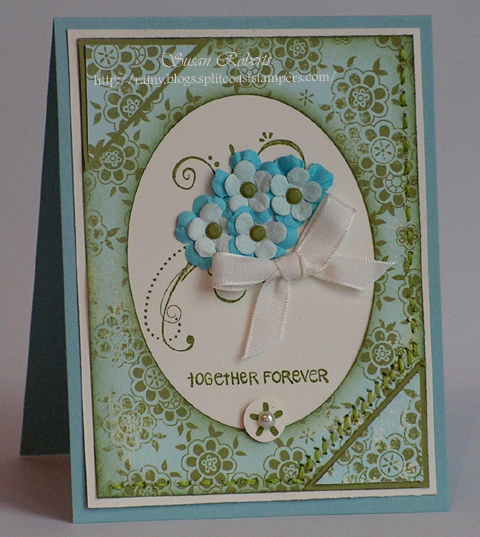
Of course I had to make her a card!  lol

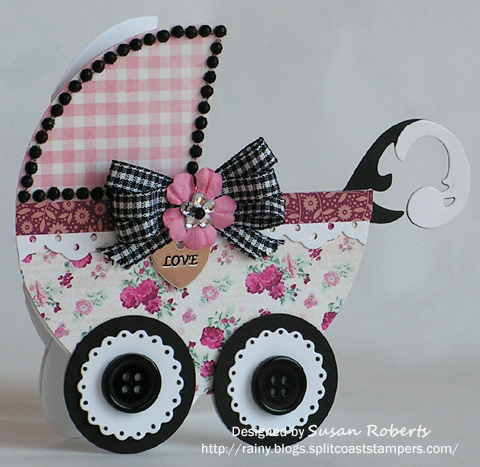
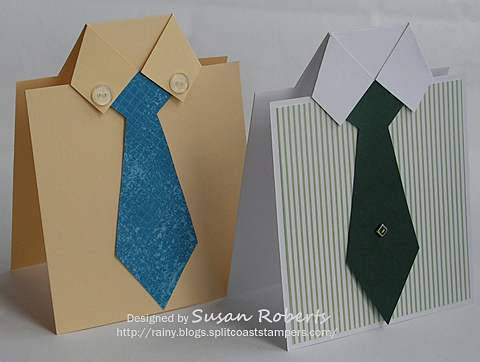
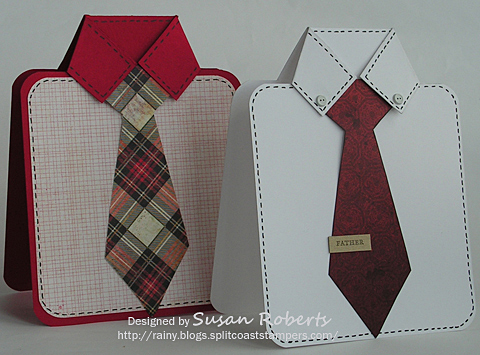
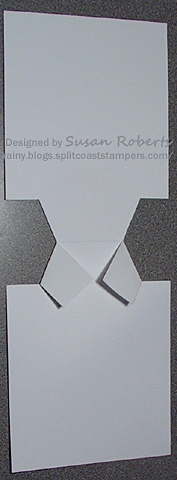
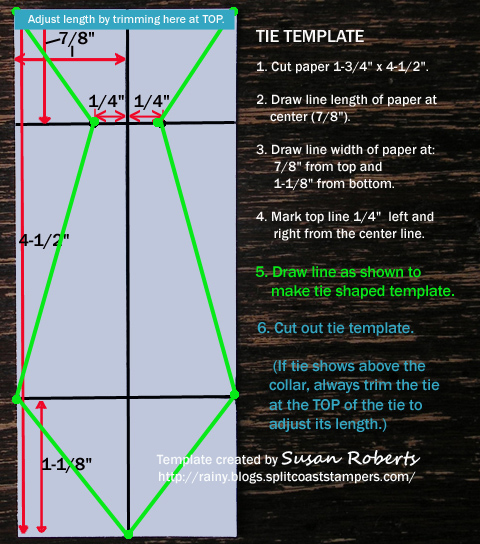
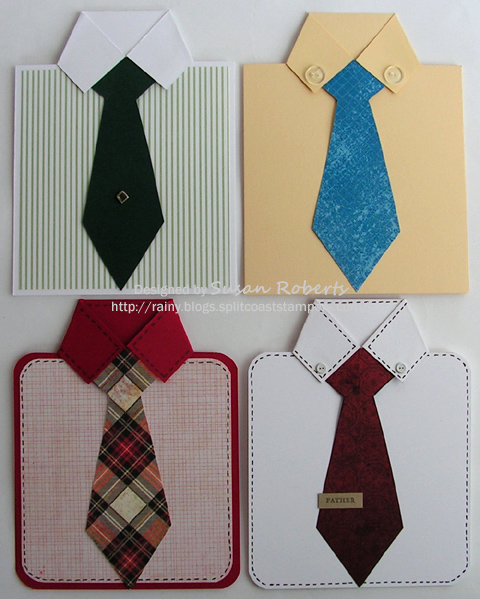
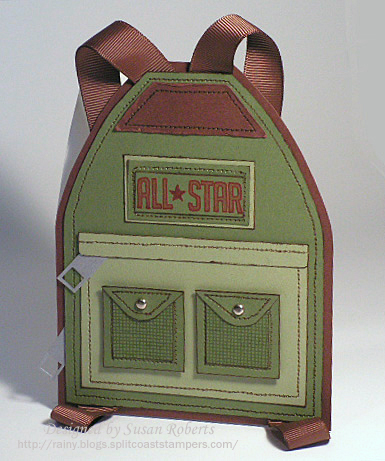
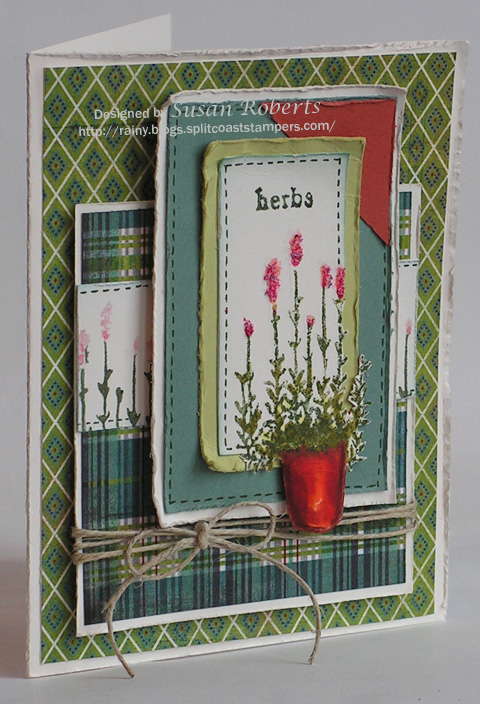
I recently saw this darling die cut shaped card and designed my card based on it.

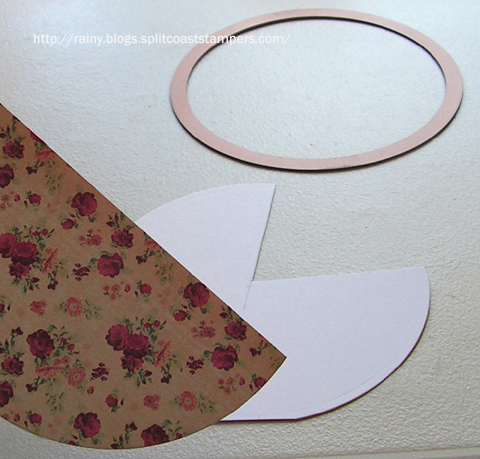
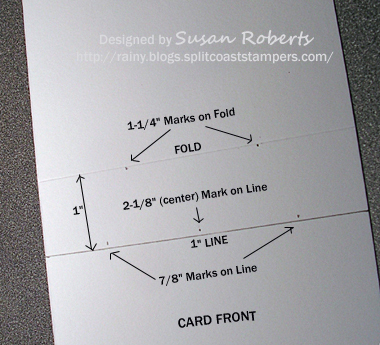
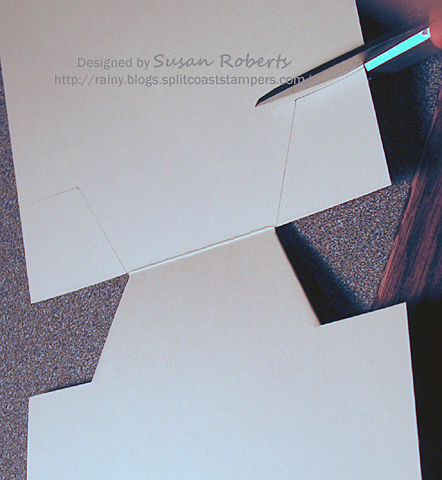
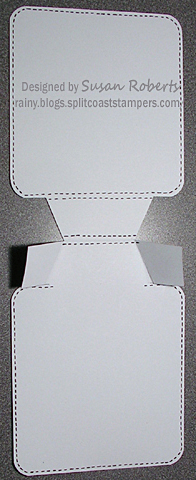
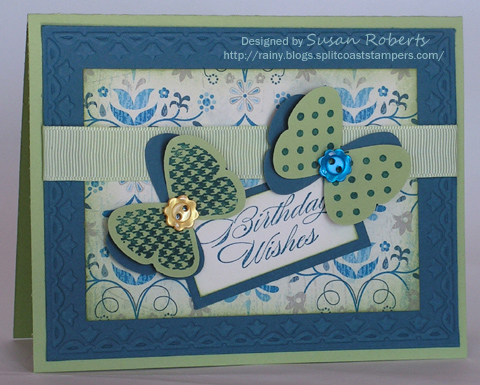
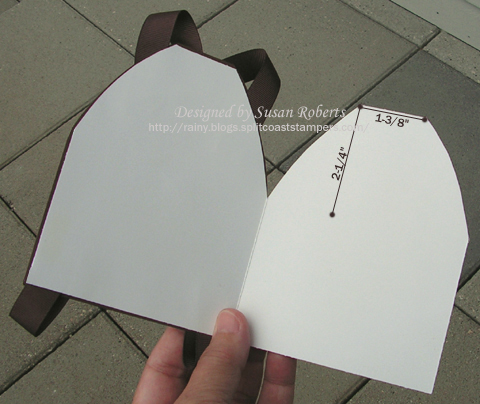
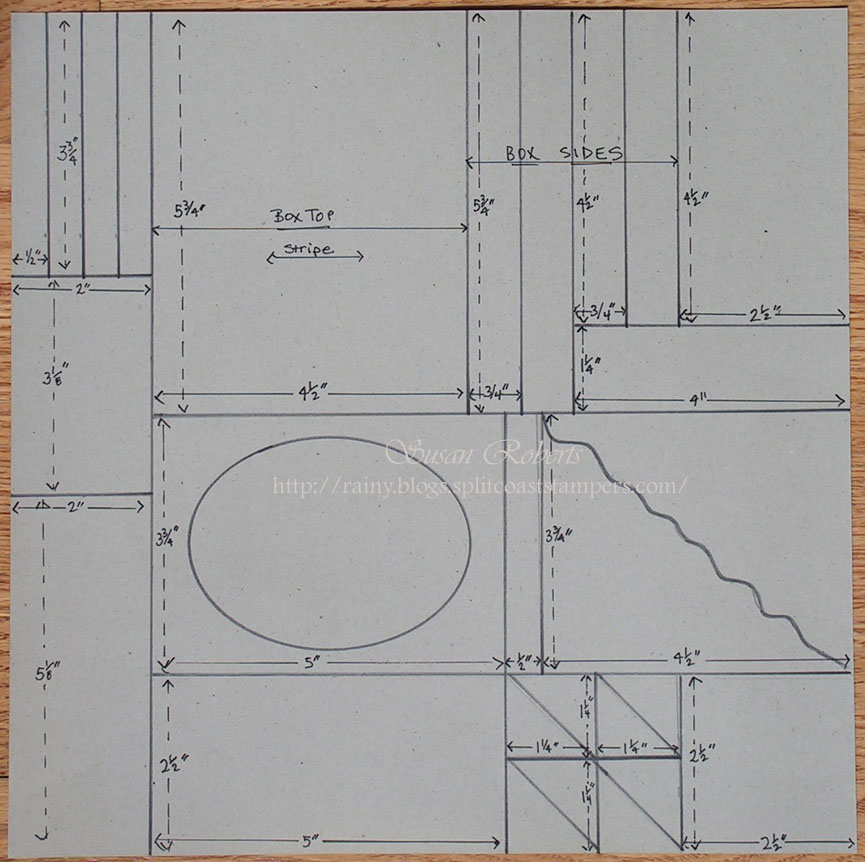
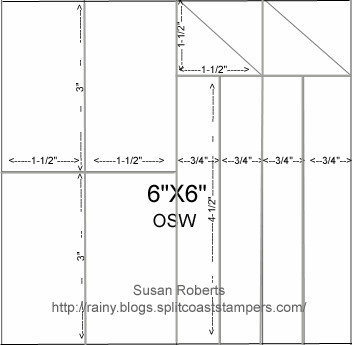
The card base uses the largest Classic Circle Nestabilities die.  Scissors were used to cut away the pie shaped section and a bit of the bottom (which was cut parallel to the horizontal cut of the pie shape).

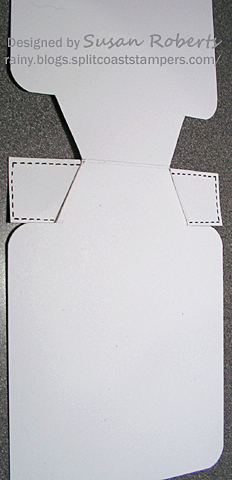
A second circle was cut as the base on which to adhere all the papers and embellishments.  This circle when adhered to the main card base hides the fold.  The largest circle die was also used to cut the designer papers.

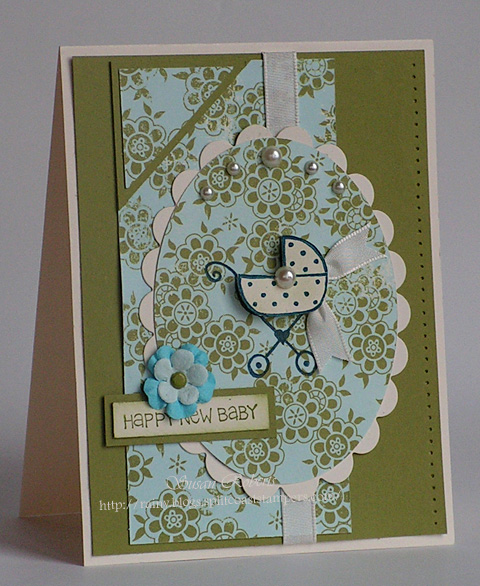
The wheels used a 1-3/8″ circle punch and the smallest Nestabilities Eyelet Circle die.  The handle was made using a flourish from the 12″ Illumination Border die.

Even though my plane landed hours ago, I’m still floating on air!  However, there is a house full of tasks that need some attention!  Thanks for dropping by today.  Hope you, too, have a happy day!

——————————

Papers: PTI Select White and True Black; My Mind’s Eye Lost & Found Blush DP

Inks: SU Basic Black Marker (inside sentiment); Black Gel Pen (dots on eyelet circles)

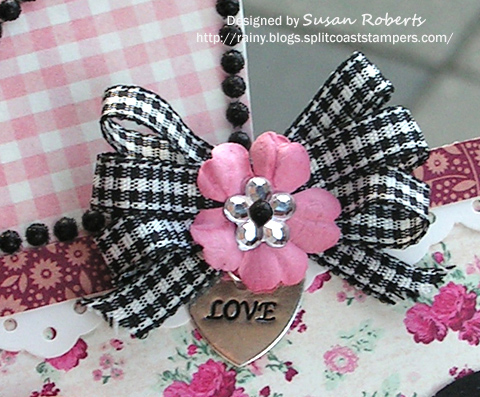
Accessories: Buttons; Pearls; Rhinestone Flower; Prima; Gingham Ribbon; Spellbinders Nestabilities Eyelet Circle (smallest) and Classic Circle (largest) and 12″ Illumination Border; SU 1-3/8″ Circle Punch and Eyelet Border Punch; ‘Love’ Charm

Aug 152011

Played in the Clean and Simple Challenge over at Splitcoaststampers.  Today’s challenge was to use a “partial image”.

I used the Nestabilities Labels 10 die as a template for sponging and finished off the edges with a faux stitch.  This helped to better define the sponged shape.

An inside sentiment with the same font worked nicely with the front sentiment even though the two were from different companies.

This particular card is going into my Operation Write Home box.  The pearls are quite small and hopefully not too bulky.

Thanks for dropping by today!  Happy Crafting!!

——————————

Stamps: SU Upsy Daisy, Butterfly Prints and Three Little Words; Verve Heartfelt Phrases (inside sentiment)

Papers: PTI Select White

Inks: Memento Tuxedo Black; SU Basic Black, Real Red and Brocade Blue

Accessories: Flatback Pearls; Nestabilities Labels 10; SU Butterfly Punch

Looks like dad will be getting a few shirts and ties for Father’s Day… again!  LOL


There is a darling shirt and tie card on p.154 of  the current SU catalog.  Not being a demonstrator, I have no idea if SU has a template for this card, so I worked up my own A2 sized design.

Shirt Tutorial

1. Begin with a standard A2 sized card base (cut to 11″ x 4-1/4″, scored in half so that the card opens from the bottom).

2. On card front, measure 1″ down from the fold and draw a line across the width of the card.

3. Mark fold at 1-1/4″ from either side.  Mark on 1″ line at 7/8″ from either side and at center (2-1/8″).  (Marks “on fold and 1″ line should be made slightly below the fold and above the 1” pencil line, respectively.)

4. Cut to the 1-1/4″ marks on the fold line and the 7/8″ marks on the pencil line.  (Cut directly on the fold and pencil line, respectively.)

5. Fold the point of the top outer corners to the 2-1/8″ center mark right above the pencil line.

6. Close the card and trace and cut out the outline on the back of the card of the area created by the folded down collar. (Cut slightly outside of the pencil lines to ensure that none of the card back is visible from the front when the card is closed.

You should end up with a card base that looks like this!

That’s it!  Of course, you can add stitching or round the corners, button down the collar or whatever!  If you want to add a patterned paper to the shirt front, it should measure 4″ x 4-1/4″.  (This will leave an 1/8″ card base border.)

Tie Template

Hope you have some fun with these!

Happy Crafting!

——————————

The GREEN shirt:
Papers
: PTI Select White; SU Handsome Hunter; Memory Box Ethan and Bella DP
Accessories: SU Ice Rhinestone Square Brad

The YELLOW shirt:
Papers: SU Barely Banana and Blueberry Crisp DSP
Accessories: SU Bitty Buttons

The RED shirt:
Papers: PTI Pure Poppy; My Mind’s Eye Stella Rose Hazel DP; Basic Grey Jovial DP
Inks: Black Gel Pen
Accessories: Corner Rounder Punch

The WHITE shirt:
Stamps: Teeny Tiny WishesOnly a portion of the stamp was used for the tie clip.  Since part of the sentiment was so close to the part that I wanted, I covered it with scotch tape before applying the ink.  This assured me that no ink would sneak onto the unwanted section.  The tape is, of course, removed before stamping.

Papers
: PTI Select White; SU Brushed Gold; Basic Grey Boxer DP
Inks: SU Basic Black Marker
Accessories: Small White Button Brads; Corner Rounder Punch


A One Sheet Wonder (OSW) is when a single piece of designer paper (dp) is used for several cards/projects with no or very very little waste left over.  After playing in Splitcoaststampers Clean and Simple Challenge a couple of weeks ago using a 3″ x 4″ piece of dp, I decided to divide the entire 12″ x 12″ double sided sheet of dp into 3″ x 4″ pieces.  That gave enough pieces to create as many as 12 cards all with a healthy helping of precious patterned goodness!

3 sketches were created all using a 3″ x 4″ sized piece of dp.  Today’s Color Challenge at Splitcoast was to use a blue, a lighter blue and a light green on a card or project.  One side of this particular dp already had the two blues.  By sponging Certainly Celery around the edges, punching a couple of light green butterflies and adding some light green ribbon, the color challenge was met.

I love designer paper SO much. So when using it, I like to challenge myself to create as little waste as possible.  Planning ahead really helps.  Hope maybe these sketches can help you, too, to use every inch of paper for something beautiful.

Happy Crafting!

——————————

(Click on the cards to enlarge.)

(This is SCS’s CC316 Card)

All Products from Stampin Up
Stamps: Flight of the Butterfly, Butterfly Prints and Bring on the Cake
Papers: Certainly Celery, Not Quite Navy, Very Vanilla and Blueberry Crisp Designer Series
Inks: Certainly Celery and Not Quite Navy
Accessories: Ice Cream Parlor Buttons, Grosgrain Ribbon, Butterfly Punch and Framed Tulip Embossing Folder

(This is SCS’s CAS110 Card)

All Products from Stampin Up

Stamps
: Plane and Simple
Papers: Pacific Point, Sahara Sand, Very Vanilla, Blueberry Crisp Designer Series
Inks: Basic Black and Not Quite Navy
Accessories: Grosgrain Ribbon


All Products from Stampin Up

Stamps: Bold Blossom and Bring on the Cake
Papers: Pacific Point, Yoyo Yellow, Very Vanilla and Blueberry Crisp Designer Series
Inks: Not Quite Navy and Summer Sun
Accessories: Grosgrain Ribbon, Not Quite Navy Brad and 3/4″ and 1″ Circle Punches

Can’t believe that summer is almost over, and it’s time to start thinking “back to school”.  So today’s post is looking back to the August ’07 Dirty Dozen Gallery at Splitcoaststampers to a couple of cards that I made.

The first is a backpack shaped card.

blog268scsddaug07withwm.jpg

The backpack was cut from a standard 5-1/4″ x 4-1/2″ piece of brown card stock. It was then mounted on a white card base which was also cut to the backpack pattern. The straps in back were adhered between the brown and white card stock so as to not inhibit the opening and closing of the card itself. A sewing machine was used to pierce the paper and then a marker was used for the faux stitching.

Here are the measurements if you want to make your own template.

blog268ainsidemeasurementwithwm.jpg

The second card is also a standard 5-1/4″ x 4-1/2″ size.

1blog268bscsddaug07withwm.jpg

The vase is on one layer of foam tape. The sentiment is on two. The canopy is on three! I used the 1/16th” and 1/8th” hand held circle punches for the ‘locks’. The locker vents are hand drawn with a gel pen.

Thanks for dropping in today.  Hope you are enjoying the last few days of summer.

Happy Crafting!

smileythankyouwithflowersani.gif

——————————

Backpack

Stamps: SU! “Sporting” and “Canvas Backgrounder”

Papers: SU! Always Artichoke, Mellow Moss, Chocolate Chip, Silver and Whisper White

Inks: SU! Always Artichoke, Chocolate Chip Classic and Marker, Cranberry Crisp, Ruby Red Marker

Accessories: GG Ribbon, Silver Brads, 1/4″ Square Punch, Corner Rounder Punch, Sewing Machine

Lockers

Stamps: SU! “Fabulous Flowers” and “Vases in Vogue”

Papers: SU! Going Gray, Basic Gray, Silver, Basic Black, Bravo Burgundy, Groovy Guava, WW, Apple Cider DP

Inks: SU! Going Gray, River Rock, Bravo Burgundy, Jet Black Stazon, Blush Blossom and Garden Green Markers

Accessories: GG Ribbon, Rhinestone Brads, Primas, Scalloped Scissors, Circle Punches, Gel Pens


It’s Dare to Get Dirty Week at Splitcoaststampers (SCS)!  If you’re a Fan Club Member, this is your chance to play along with Dirty Girls, past and present, in a ton of fun challenges.  We’d love to have you join us!  There are 33 challenges to choose from.  Play one or play them all!  (And if you’re not a Fan Club Member, this is the perfect time to become one!)

I’m so happy to be hosting one of these challenges today.  Here is the card I created to serve as a sample for it.  You can find my challenge on SCS here.

blog262dtgd10cardwithwm.jpg

I love the stamps from this Flourishes “Summer Botanicals” set.  The image was made by coloring directly onto the stamp with water based markers and then lightly spritzing the stamp with water before stamping.  The image was lightly filled in here and there with a few Copic MarkersFlower Soft was added to the herb’s blossoms.  After cutting out the flower pot and part of the plant, the flower pot was shaped/rounded and adhered with foam tape.  It was placed on the back in the middle of the bend to give the flower pot some dimension.

blog262dtgd10closeupwithwm.jpg

The second card was made as a sample for Dawn Burnworth’s (flowergal36) DTGD Challenge.  Here is Dawn’s challenge.

1blog262dtgd10sample4dawnwithwm.jpg

The butterfly image is from Hero Arts “Antique Engraving”.  Coloring was done with Copic Markers, and Stickles was added to the butterfly bodies for some sparkle.

blog262dtgd10sample4dawncloseupwithwm.jpg

For anyone interested, I have made a template for this 4-1/4″ x 4-1/4″ butterfly card.  If it is saved and then opened and printed as a jpg from Adobe Photoshop, I believe it will print to that size.

rainydaycreationsbutterflytemplate.jpg

Hope that you can join in on the DTGD fun over at Splitcoaststampers.  Happy Crafting!

——————————

Herb Card

Stamps: Flourishes Summer Botanicals

Papers: PapertreyInk Vintage Cream, Spring Moss and Ocean Tides; SU! Really Rust; Basic Grey Oliver Designer Paper

Inks: SU! Markers Pretty in Pink, Really Rust, Old Olive and Always Artichoke; Copics:

r30.jpgr32.jpgr35.jpgyr01.jpgyr04.jpgyr071.jpge082.jpg

y11.jpgyg93.jpgyg95.jpgt0.jpg

Accessories: Flower Soft Raspberry Fizz and Glue; SU! Photo Corners Punch and Hemp Twine

Butterfly Card

Stamps: Hero Arts Antique Engraving ; Savvy Stamps Happy Birthday

Papers: PapertreyInk Select White, Aqua Mist and True Black

Inks: Memento Tuxedo Black; SU! Basic Black Marker; White Gel Pen; Copics:

bg0001.jpgbg02.jpgbg09.jpg

Accessories: Prima Say It in Pearls with Flowers; May Arts Black Silk Ribbon; Ranger Stickles

This One Sheet Wonder (OSW) I created let’s me cheat a little.  heheh  It allows me to use an entire sheet of 12X12 (for 6 cards); or if I can’t bear to part with the entire sheet, it allows me to use just half of it (12X6 for 3 cards).

For Father’s Day I needed several cards.  I had 2 full 12X12 sheets of designer paper with a masculine theme/feel that I thought looked good together even though they were not by the same manufacturer.  So I only had to use half of each sheet to make up a full 12X12 OSW.  Plus, since they were doubled sided, I had 4 different patterns to play with!  Is this clear as mud?  lol!

smileyprofessorani.gif

Maybe some pictures will help!  Here is the set I made.  There are 3 Father’s Day cards and 3 masculine birthday cards.

blog182cardswithwm.jpg

Here is the template and a picture of the cut papers.  Laying the pieces out like this prior to making the cards helped me make sure that each pattern was used 3 times.

blog182template.jpg  blog182dpwithwm.jpg
(Click on the images to enlarge.)

This template also allows for a strip of coordinating paper for the inside of each card.

2blog182insidewithwm.jpg

Finally, here are closeups of each card with their recipes below.

blog182card1withwm.jpg

Stamps: Great Impressions “C322 – Happy Father’s Day”

Papers: SU! Very Vanilla; Memory Box “Sapphire”; Reminisce “Father” DP; Moxie “Tool Time” DP

Inks: Memento “Tuxedo Black”

Accessories: May Arts 1-5/8″ Twill; Circle Nestabilities; Cuttlebug; SU! “Photo Corners” Punch; Screw Brad

blog182card2withwm.jpg

Stamps: Katie & Co. “Happy Birthday”

Papers: SU! Whisper White; Memory Box “Sapphire”; Reminisce “Father” DP; Moxie “Tool Time” DP

Inks: Memento “Tuxedo Black”

Accessories: May Arts 5/8″ Twill; Circle Nestabilities; Cuttlebug; SU! “Photo Corners” Punch; Screw Brad; Twine

blog182card3withwm.jpg

Stamps: SU! “Wonderful Favorites”

Papers: SU! Whisper White; Memory Box “Sapphire”; Memory Box “Sapphire” Notecard; Reminisce “Father” DP

Inks: Memento “Tuxedo Black”

Accessories: SU! “Photo Corners”, “Large Star” and “Star” Punches, SU! Rope; Star Brad

blog182card4withwm.JPG

Stamps: SU! “Celebrate Everything” and “It’s Your Birthday”

Papers: SU! Very Vanilla; Memory Box “Sapphire” Notecard; Moxie “Tool Time” DP

Inks: Memento “Tuxedo Black”

Accessories: SU! “Photo Corners” Punch and Rope, Hammer and Wrench Bradsblog182card5withwm.jpg

Stamps: SU! “All Holidays”

Papers: SU! Whisper White; Memory Box “Sapphire”; Reminisce “Father” DP; Moxie “Tool Time” DP

Inks: Memento “Tuxedo Black”; SU! Black Marker

Accessories: May Arts 5/8″ Twill; SU! “Photo Corners” Punch; Argyle Embossing Folder, Cuttlebug, Hammer and Wrench Brads; Twine

blog182card6withwm.jpg

Stamps: SU” “Starring You”

Papers: SU! Very Vanilla; Memory Box “Sapphire”; Reminisce “Father” DP; Moxie “Tool Time” DP

Inks: Memento “Tuxedo Black”

Accessories: May Arts 5/8″ Twill; Circle Nestabilities; Cuttlebug; SU! “Photo Corners”, “Large Star” and “Star” Punches; Star Brads

Hope you have a wonderful day.  smileythankswithflowerani.gif for dropping by.

blog168ic176inspirationpiece.jpgToday over at Splitcoaststampers the Inspiration Challenge is an on-line store called Skeem where you can find beautiful candles and perfumes.  The  inspiration for my project came from the candle pictured here on the left.  It reminded me of a piece of double sided designer paper that I purchased several months ago.  I had not yet done anything with the 12″ X 12″ piece, so I decided to do a One Sheet Wonder (OSW) with the entire sheet.  I’m such a paper hoarder which means that doing a project that would use up ALL of the paper was a big deal for me!  lol

Here is the finished project.  The set consists of 6 cards and my favorite little box (template by Leslie Miller) in which to put them all.

blog168ic176groupsmallwithwm.JPG

Below each card is pictured individually.

blog168ic176cardweddingwithwm.JPG

On this first card I did a little stitching in the lower right hand corner.

blog168ic176cardweddingcloseupwithwm.JPG

blog168ic176cardbd1withwm.JPG

blog168ic176cardbabywithwm.JPG

blog168ic176cardgetwellwithwm.JPG

blog168ic176cardbd2withwm.JPGblog168ic176cardthankswithwm.JPG

And the box with an elastic band to hold it all together…

blog168ic176boxwithwm.JPG

I had so much FUN!!  And I don’t seem to be suffering any negative effects from using that entire piece of designer paper!  Oh and for anyone interested, here is the template I created for the OSW.

blog168ic176templatewithwm.JPG   blog168ic176grouplargewithwm.JPG
(Click on pictures to enlarge.)

Happy Stamping!

——————————

Stamps: SU! “Priceless” and “Fun & Fast Notes”

Papers: SU! Very Vanilla, Old Olive, Baja Breeze; Making Memories “Hillary Lace Flower” Designer Paper

Inks: SU! Old Olive and Not Quite Navy

Accessories: SU! Very Vanilla Taffeta Ribbon, Brads, Flower Fusion Felt Flowers, Paper Piercing Template and Tool, Photo Corner Punch; Cuttlebug; Oval Nestibilities; 1/2″ Circle Punch; Embroidery Needle and Floss; Primas; GG Ribbon; Elastic Cording

blog16611withwm.JPGEver since seeing this post over at mel stampz, I have wanted to try making my own embossing template.  The new set “Central Park” from SU! had the perfect stamps to give this a try with an outline stamp of a stem and 3 leaves and a filler stamp for the the outline.

To make the template, I stamped the outline image 3 times on SU!’s Whisper White card stock and cut them out.  (A light weight cardboard could also be used.  However because of the tighter cutting required for this particular image, I opted to use card stock making it a bit easier to get into those more difficult areas with my scissors.)

2blog1661withwm.JPG 1blog1662withwm.JPG

Next I glued the 3 pieces together and trimmed any overlaps that occurred from the images not being cut out exactly the same.  This is important in order to get a deep, crisp and clean embossed line.

blog1663withwm.JPG

Once the template was finished I ran it through my Cuttlebug.  Be sure to use an embossing mat on the opposite side of the card stock from the template.  This single image is actually the reverse of the stamped image.

blog1664withwm.JPG

With this template, it can be run through in either direction!

blog1665withwm.JPG

You can also use the positive or negative side of the embossed image.  Here I have used my stamp-a-ma-jig to make sure the filler stamp was positioned right over the embossing.

The positive:blog1666withwm.JPG

The negative:blog1667withwm.JPG

I added some faux stitching around the negative embossed image.

blog1669withwm.JPG

Here is the finished card.

1blog166card1withwm.JPG

Well I was having so much fun that I decided to play some more.  This time I started by embossing my card stock with the Swiss Dots embossing folder before using my Central Park template.  Just for some embossing interest, I used the negative embossed Swiss Dots for the positive Central Park embossed image.  And rather than using the filler stamp for the leaves, I distressed the embossing by rubbing my ink pad over the entire image several times.

blog1668withwm.JPG

And the finished card… TOO FUN!!!

blog166card2withwm.JPG

smileyflowerani.gifHope everyone has a wonderful and beautiful Easter!

——————————

Masculine Card: (SUO)

Stamps: “Central Park” and “On Your Birthday”
Papers: Whisper White, Basic Gray, Old Olive, and  DSP “Bella Bleu”
Inks: Certainly Celery and Basic Black
Accessories: Old Olive 1/4″ Twill Ribbon, Certainly Celery Twill Ribbon, Basic Gray Corderoy Button, Brads, Photo Corners Punch

Feminine Card:

Stamps: SU! “Central Park” and “On Your Birthday”
Papers: SU! Whisper White, Taken with Teal and Certainly Celery; DCWV Designer Paper
Inks: SU! Certainly Celery and Taken with Teal
Accessories: SU! Fleurette, Scallop Circle Punch, Scallop Border Punch and Brad; Cuttlebug Swiss Dots Embossing Folder; Primas; Flatback Pearls; May Arts Ribbon

Probably my biggest addiction, even more than collecting actual stamps, is designer paper. PAPER!!! I love it!! But I find that I don’t use it because then it would be gone. D’oh. So I have begun to quarter my 12″X12″ sheets. This way I have FOUR… YES FOUR pieces of paper. I can let my little hoarding self use one or two of these pieces and still have some left!! Woohoo!! Well it works for me. LOL!!

blog158cardscloseupwithwm.JPG

So that is where I started today, with a quartered piece of 12″X12″ designer paper.  To make sure that there was absolutely no waste of my precious paper, I created another 6″X6″ One Sheet Wonder (OSW) template.  I just love making these.  They also work, of course, for all of the 6″X6″ pads of designer paper available now.  And I created a sketch (which I almost followed!  lol) that can be used with the pieces from the OSW that will make into four cards.  Here’s the template for the OSW.

blog1586x6onesheetwonder1forsetof4withwm.jpg

I needed a couple of masculine birthday cards and a couple of wedding cards.  Since this was a double sided patterned paper, it worked out perfectly with the stripes on one side and the blue toile like floral on the other!  Plus my 10 Designer Centers & Borders from JustRite had everything I needed for sentiments all in one set!

blog158pieceswithwm.jpg

Here is the sketch.

blog1586x6onesheetwonder1sketchwithwm.jpg

If you decide to give this OSW/Sketch design a try, please let me know.  It would be so much fun to see what you have created!

blog158cardswithwm.JPG

Happy Crafting!!!

——————————

Stamps: JustRite 10 Designer Centers & Borders

Papers (all SU!): Whisper White, Baja Breeze (wedding only), Kraft and Chocolate Chip (birthday only),  DSP Parisian Breeze

Inks: SU! Chocolate Chip Marker

Accessories: Brads, SU! Photo Corner Punch, Cuttlebug, Swiss Dot Embossing Folder (wedding only), Argyle Embossing Folder (birthday only), SU! Taffeta and Satin Ribbon Rose (wedding only), SU! Rope Twine (birthday only)

© COPYRIGHT © and FTC Declaration

All content on my blog is COPYRIGHT © 2008-2024 Susan Roberts. Please don't copy any of my stuff for publication, design or contest submission. I declare that I sometimes promote and/or endorse products that I currently receive or have received either for free or at a discount. That said, I won't ever recommend anything that I don't personally enjoy using or feel is a quality product.
© 2020 Rainy Day Creations Suffusion theme by Sayontan Sinha