The new Shady Tree Studio floral images that were recently released are so beautiful, and I couldn’t decide which one I wanted to craft with first.  So, I chose all 5 and made a set complete with a matching gift box.  (Sometimes indecision can be a fun thing!)

blog149classroom4boxset1withwm.JPG

When you use designer paper (dp) do you often end up with lots of little bits and pieces of it which are then generally wasted.  Well, to prevent any waste, I came up with a template not long ago that uses 2) 6″X6″ pieces of dp.  This works well with all of the 6″X6″ paper pads available now.  And all of the pieces of dp used on the box and the 5 Shady Tree cards came from those 2) 6″X6″ pieces.

Here are the templates.

blog149classroom4template1withwm.JPG

blog149classroom4template2withwm.JPG

I used ALL of the paper on both of the 6″X6″ pieces of paper.  Even the little 1/4″ square was used on the box with the brad.

I have used this template before but made 6 cards with it rather than just 5.  Instead of having corner pieces on the cards, I had 6) 3″ X 1-1/2″ panels.  So only 2 corner pieces remained with that template.

Hope you can join me over at the CLASSroom for lots more pictures and details about the cards.

Thanks so much for dropping by today!! smileythankswithflowerani.gif


The party has gotten so big over at Sharon’s blog that today “Stamp Simply Celebrates” is spilling right over onto mine!!  With Christmas almost here and lots of mailing to do, I think that Gift Cards are one of the best ways to send a little love to family and friends.  Well every gift card needs a holder, and there is a template and a whole gallery for inspiration that uses that template over on Splitcoaststampers (SCS).  That’s because it was SCS’s Sketch Challenge #101.  So your challenge is to make a gift card holder.  Now if you have a different design that you like or want to try, no worries.  Go for it!

Splitcoaststampers SC101 Gallery

Template/Instructions

3blog136withwm.JPG

Now I have some really USEFUL Blog Candy that I hope any and everyone can use.  Nope… it’s NOT stamps.

3blog136openwithwm.JPG

Yup!!  It’s a gift card!  LOL  I will send the winner their choice of the two gift card holders above WITH their choice of either of the two gift cards shown!!  The first card for Target has a $20 value.  The second card for Starbucks also has a $20 value.  I’m not a coffee drinker, but I can tell you their hot chocolate can’t be beat!!  To enter just leave a comment ON THIS POST.  If you play in my challenge, please come back here and leave me a link to your creation!  I REALLY want to see them all as I LOVE these little things.  Oh and as a fun twist… if you do play and leave me a link here… you will automatically have a second entry for my Blog Candy!!  Woohoo!!  I will use random.org on Friday, December 12th at midnight PST to pick the winner!

For some wonderful inspiration I have some sample makers!!  Check out their beautiful creations:

Janine2BKrafty

JenniferThe Buck Stamps Here

DarleneDar’s Crafty Creations

AJThe Willow Garden

A couple of Christmases ago my DDIL Kimberly and I stamped our hearts out making these fun holders.  Here are some that she made.

33blog136stampsimplyk.jpg

3blog136stampsimplyi.jpg

3blog136stampsimplyj.jpg

Here is a peek into the Dirty Dozen Fan Club gallery over on SCS from August of last year.  (I had such fun with these.  They are scratch ‘n sniff… chocolate and apple scented!)

3blog136stampsimplye.jpg

3blog136stampsimplyf.jpg

And here are some others that I have made for wedding or new baby gifts.

3blog136stampsimplya.jpg

3blog136stampsimplyb.jpg 3blog136stampsimplyc.jpg 3blog136stampsimplyg.jpg
(Click on picture to enlarge.)

smileypartyhat1ani.gifRemember:  Anyone can play ANY of the challenges by ANY of the hostesses during the 12 days of Stamp Simply Celebrates!!!   You DO NOT need to have a Blog to playuploading your project to SCS (Splitcoaststampers.com) is not only permissible, but HIGHLY ENCOURAGED.  When doing so, use the KEYWORD SSC08.

Have a wonderful Sunday!  Hope you can play along in my challenge!!!  These holders are so quick, so easy and SO FUN!!

——————————

Recipe for my Christmas Gift Card Holders:

Stamps: SU! ‘Winter Post’

Papers: SU! Chocolate Chip, Ruby Red, Baja Breeze, Ruby Red, ‘Holiday Treasures’ DSP

Inks: SU! Chocolate Chip Classic and Ruby Red, Certainly Celery, Old Olive Markers

Accessories: Metal Photo Corners and Brads, Designer Label Punch, Corner Rounder Punch, Cuttlebug, Die Cut ‘Vintage’, Gift Wrap Ribbons, Kaiser Rhinestones

COMMENTS ARE NOW CLOSED FOR THIS POST

I just love making these little miniature boxes.  Aren’t they cute!

blog116boxeswithwm.jpg

Last week I made one for a door hanger project and promised a template for it this week.  So here it is.. more or less.  lol

blog114box6withwm.jpg

I tried to make it such that the template actually printed to the size/measurements shown on the template.  However, I could not get it to be exact.  Sorry I’m so computer challenged.smileyrolleyes.gif  However because of the angles and shape of the template it is relatively easy to tell where the folds and cuts go without doing any measuring.

blog116box8.jpg

blog116box99withwm.jpg

So the easiest thing to do is simply print the template, cut it out and then just trace around the outside of it.  As long as the proportions are kept the same, the template will work fine to make a smaller or larger size box. When I printed it out the longest measurement (which shows as 9″ on the template) was just over 8″ in actuality.  So it printed a little smaller.  The picture of the boxes at the top of this post shows this smaller box in front (“friend”) and the actual measured to scale box is shown in back (“thanks”).

If you do want to make a box the exact size as the template and you want to measure it, I have all the measurements on the template in a 1/16″ scale, ie 4/16″ instead of 1/4″.  This was just to keep it consistent.

Here is the template:  4blog115boxtemplate.jpg

Here are some pictures of the box construction.  Just a note.. on the “Flap” I used a corner rounder punch to round the corners.  On “Bottom B” and “Bottom D” I used scissors to snip off a small triangular shape at the angled corners as shown in the pictures below.

blog116box9.jpg

blog116box999.jpg

All folds are in the same direction.

blog116box1smallwithwm.jpg

blog116box2withwm.jpg

blog116box3withwm.jpg

blog116box4withwm.jpg

blog116box5withwm.jpg

blog116box6withwm.jpg

The Glittering Christmas paper on the green box is from Flourishes.

blog116box7withwm.jpg

And it’s done!  If you have any questions, just ask.  I will answer them as soon as possible which will most likely be next week.  Got a big weekend planned.  Tonight is a craft night of sorts at our church, and I will be teaching a couple of ladies how to make a few cards.  And then tomorrow is my 17 year old son’s homecoming dance.  There are 14 couples in his group.  He has organized the whole thing, has everyone showing up at our home for pictures to start the evening off (14 couples and parents) and then 2 huge limos will come to take them to dinner and the dance, etc.  Plus they are all returning here around midnight after their haunted house adventure to watch a movie in our little home theater.  Should be some crazy fun.  He is my last of 4 sons and I am cherishing every minute of it.  They grow up so so so fast…

Finally… the BLOG CANDY!  A Muse has just released the coolest set called “Hero Mail”.   $2 from the sale of each set goes to Operation Troop Aid.  Well I just love the set, and so I bought 2… one for me and one for you if you are the winner!  I’ll have it up on my blog sometime next week.  It’s a perfect set for Veteran’s Day!

Hope everyone has a great weekend.  Oh and if you do make a box or two and post them somewhere, PLEASE leave me a link.  I would LOVE to see them!!

——————————

blog116boxesopenwithwm.jpg

Stamps: SU! Everyday Flexible Phrases

Papers: SU! DSP Autumn Vine, Really Rust, Sage Shadow; PTI White

Inks: SU! Really Rust Classic

Accessories: SU! 1/2 inch Striped Grosgrain; McGill Leaf Punch

May 032008

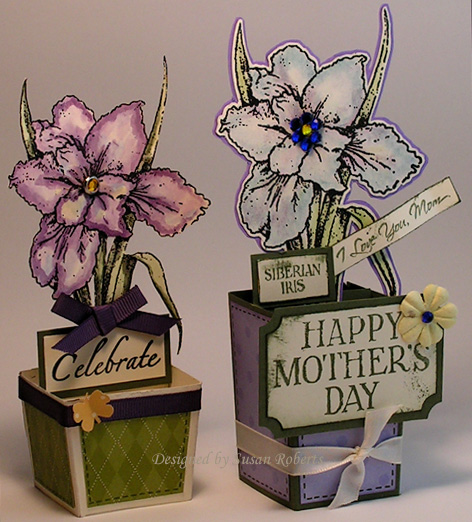
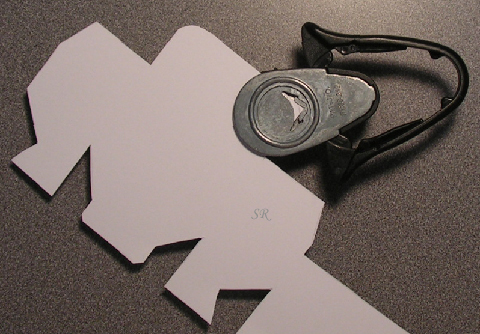
My “Siberian Iris” set from Fourishes arrived yesterday! Couldn’t wait to play with it! I made a couple of fun little baskets.
1blog48awithwm.jpg

I took some pictures along the way in case anyone wants to make one, too.

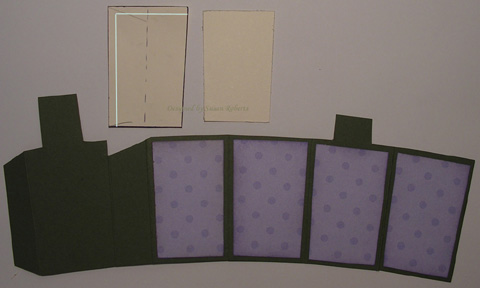
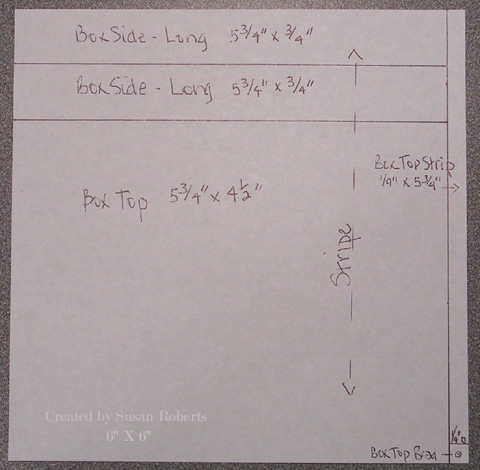
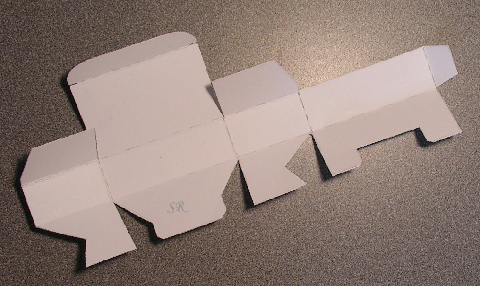
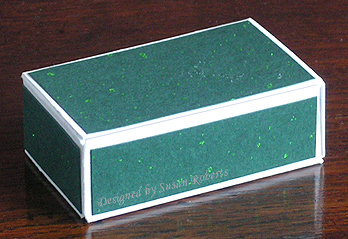
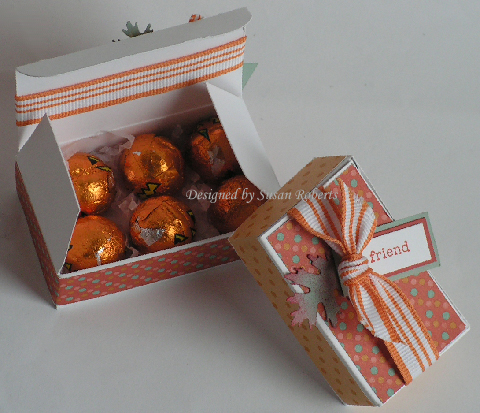
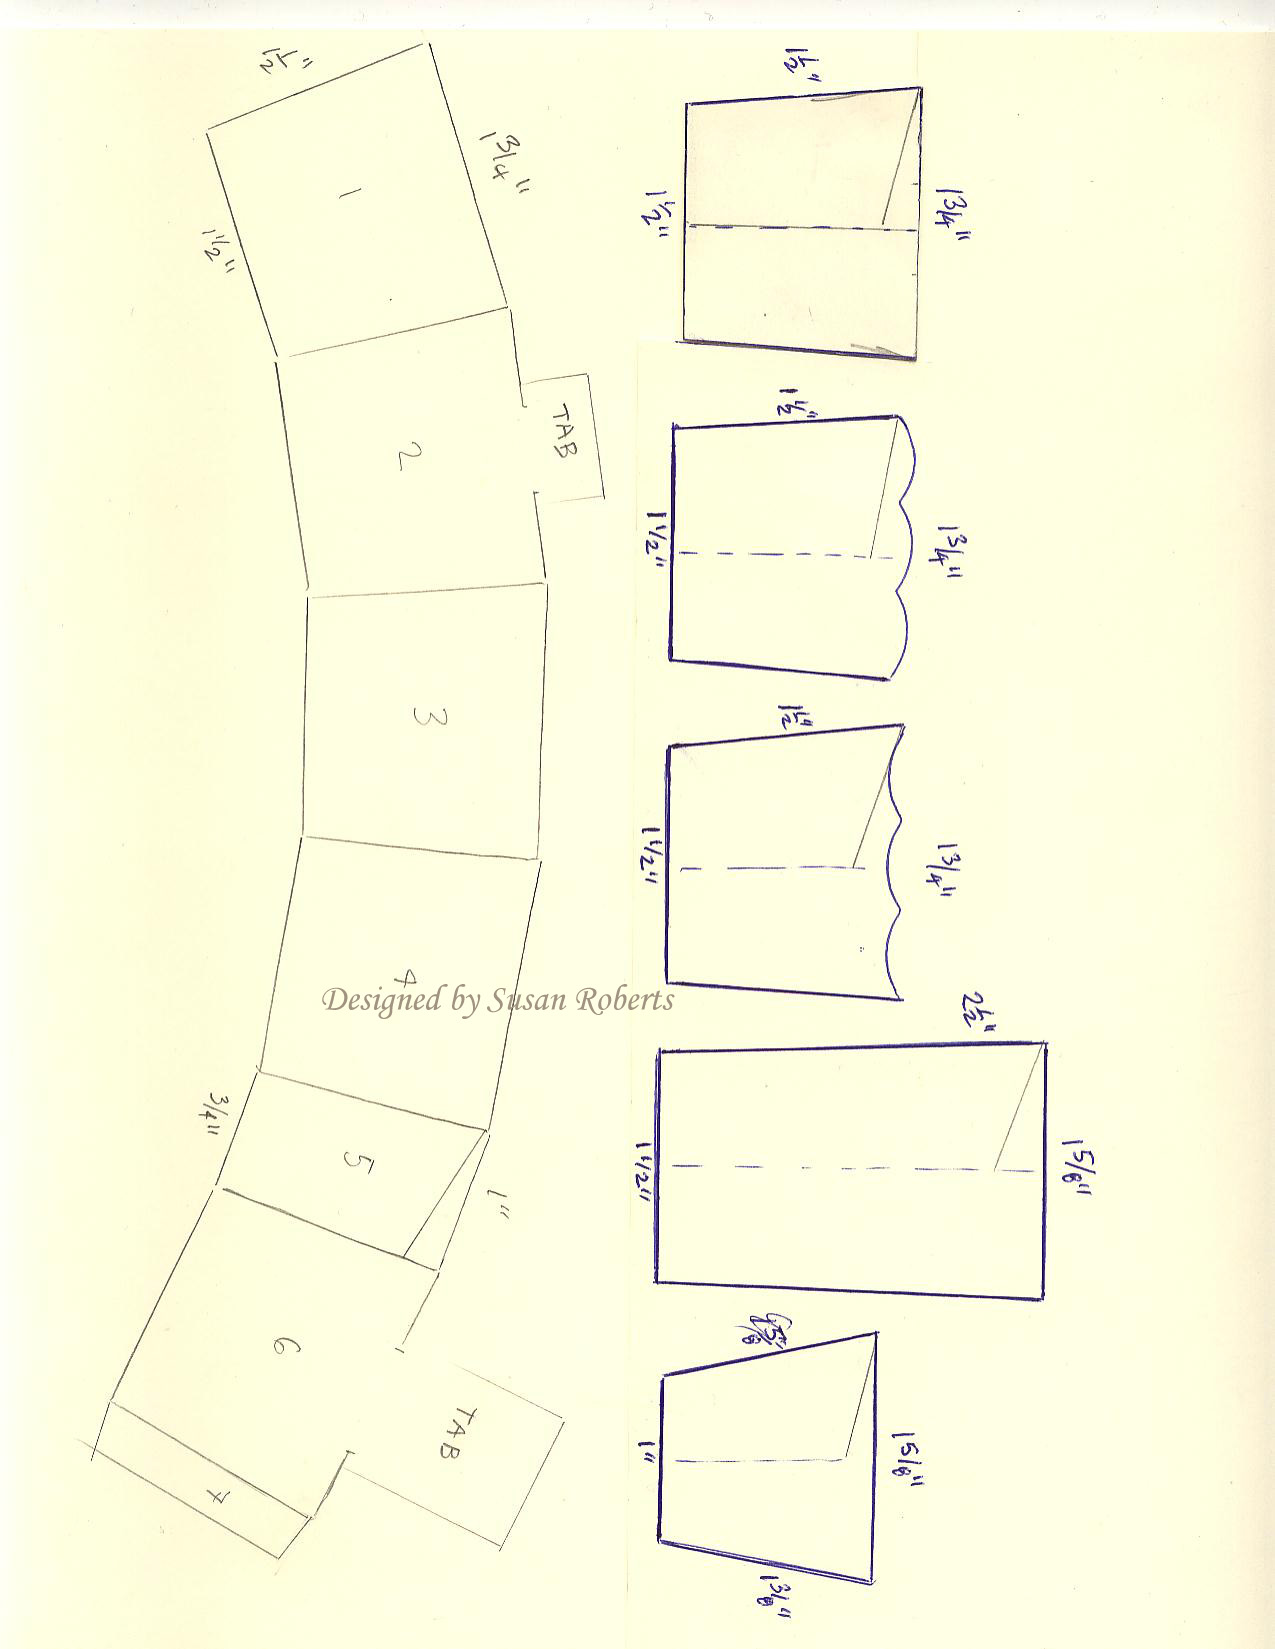
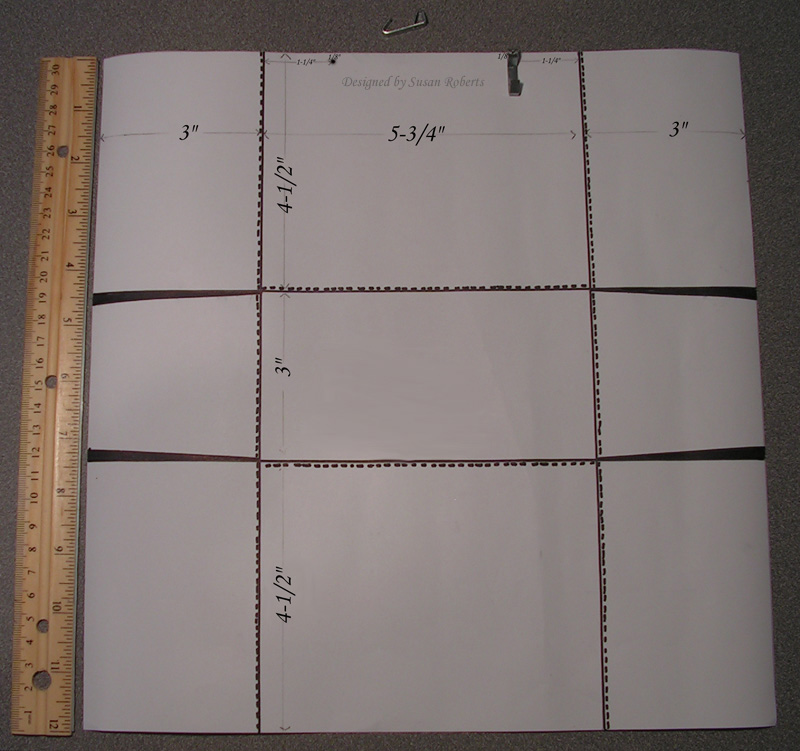
First decide what size and shape you want your “basket” to be. Here are some examples or ideas. I also included a template with each section numbered 1-7.

blog48bwithwm.jpg

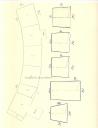
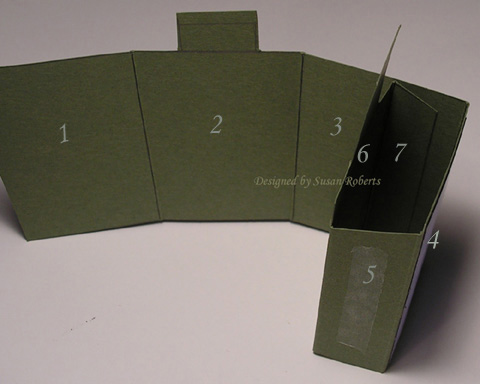
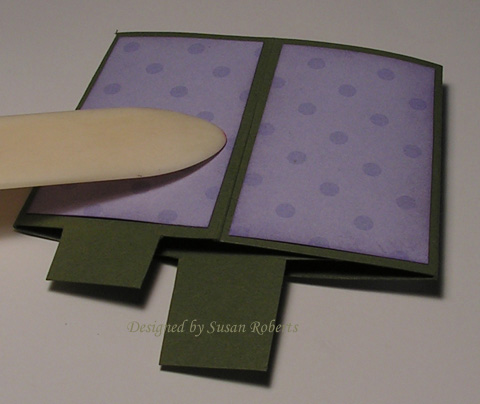
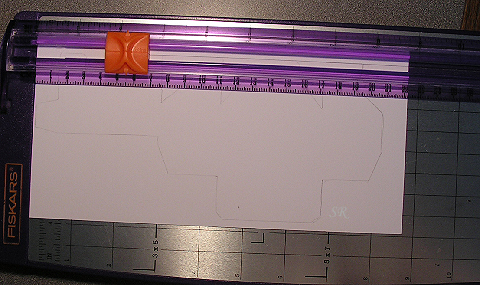
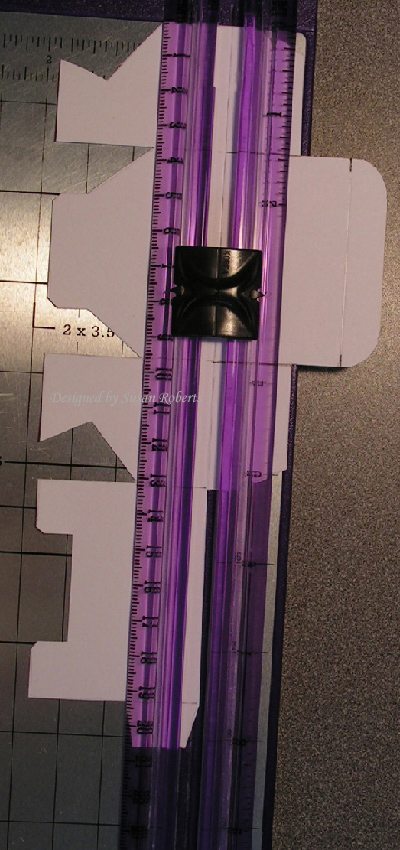
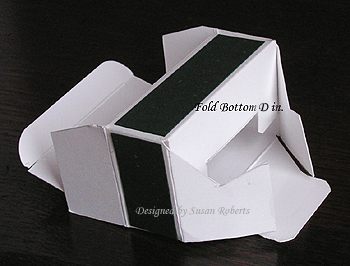
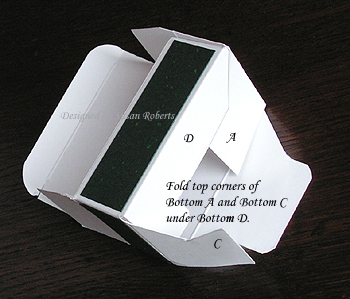
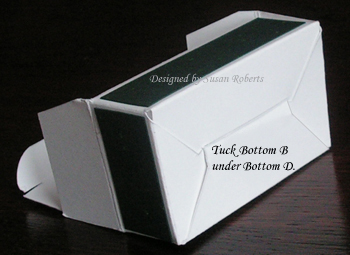
You will need to make and cut out a template of your desired basket shape. Then trace around it 4 times placing each one side to side. On the 5th section do only 1/2 (or a little less) of the basket shape. Then do one more full basket shape and finally a 7th section which is just a tab for gluing. This 7th section should be less than 1/2 the width of your template (and the same width or less of section #5). Be sure to add a couple of tabs on sections #2 and #6 with the #6 tab being a little taller. If you want to have three decorated sections, add another tab to section #4. This tab should be the tallest of the three as it will be the back row. Cut out your basket and score all the sides. Fold the basket so that the tracing lines will be on the inside of the basket.

blog48cwithwm.jpg

3blog48dwithwm.jpg

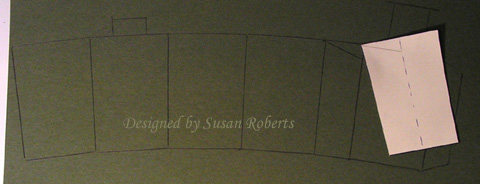
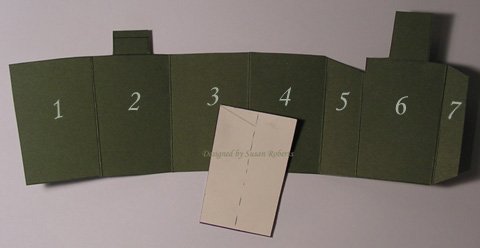
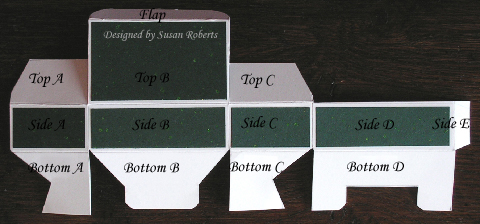
To add patterned paper, make another template that is 1/4″ less in height and width than your basket template. Trace 4 of this smaller basket shape on the back of whatever patterned paper you are using. (This step is optional. You can, of course, stamp images on the basket or even leave it plain.) Turn your cut out basket over so that all the tracing marks (if you have them like mine does…) and adhere your patterned paper to sections #1-4.

1blog48ewithwm.jpg

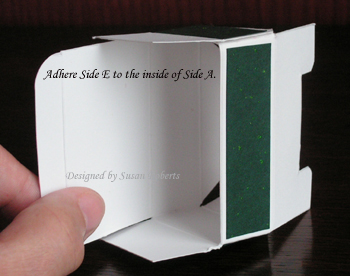
Apply adhesive to the outside of sections #5 and #7.

blog48fwithwm.jpg

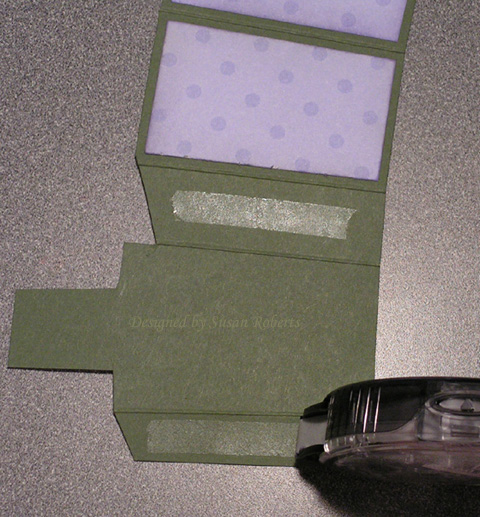
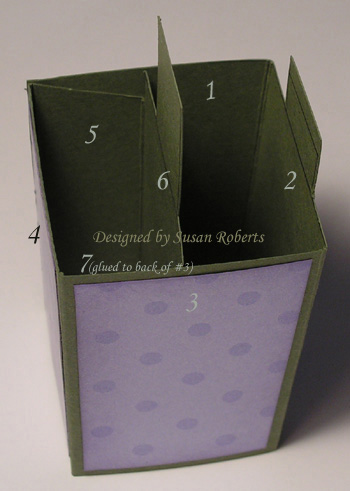
Adhere section #7 to the inside of section #3 to form a rectangle. (If section #7 is smaller than section #5, make sure it is glued on section #3 far enough away from section #4 so it equals the measurement of section #5 and forms a rectangle.)

1blog48gwithwm.jpg

Adhere section #1 to the outside of section #5.

2blog48hwithwm.jpg

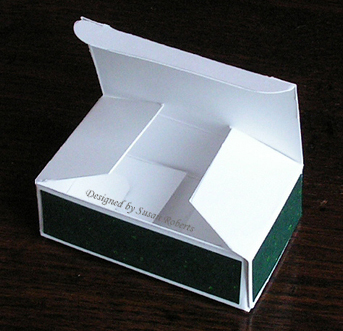
Make sure that your sections will fold flat for mailing.

blog48iwithwm.jpg

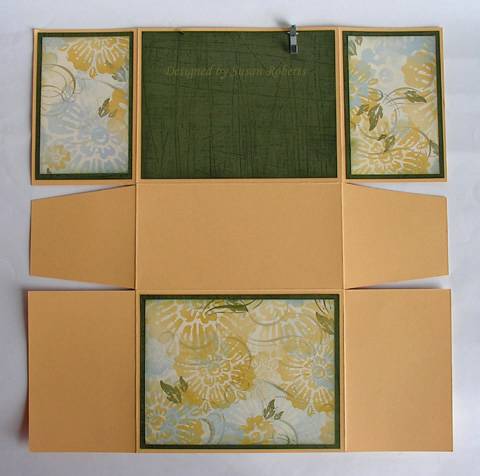
Decorate as desired!

blog48jwithwm.jpg

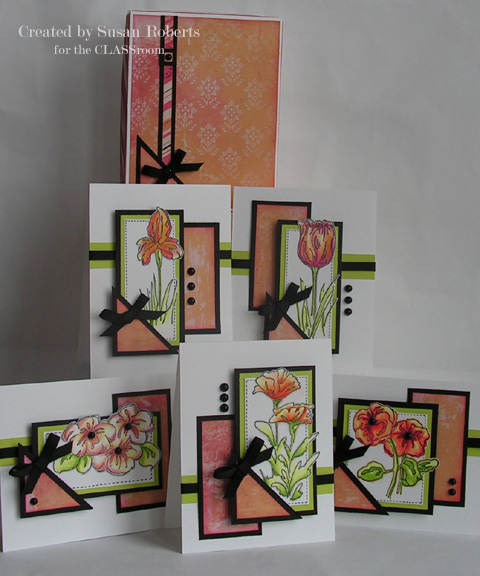
Basket 1 – Celebrate
Stamps: “Siberian Iris” and “Many Sentiments” both sets from Flourishes
Papers: Always Artichoke, Very Vanilla, DP is SU! “Prints”
Inks: Jet Black Stazon, Always Artichoke Marker, Reinkers in Always Artichoke, Old Olive, So Saffron, Bashful Blue, Elegant Eggplant
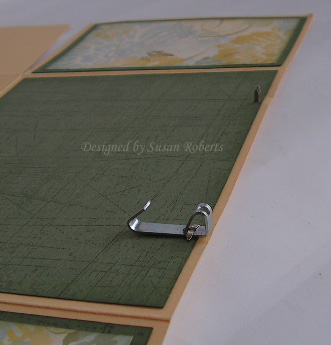
Accessories: Eggplant GG Ribbon, Rhinestone Brad, Butterfly Punch

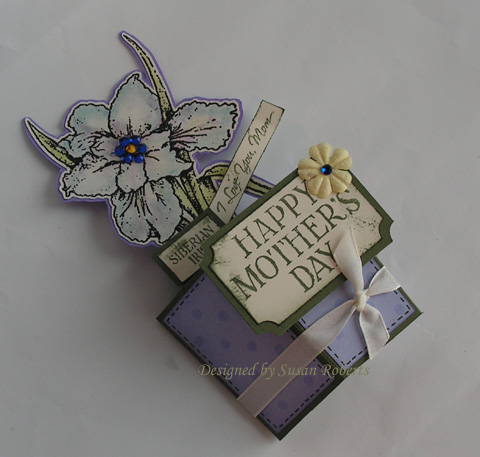
Basket 2 – Happy Mother’s Day
Stamps: “Siberian Iris” from Flourishes
Papers: Always Artichoke, Lavender Lace, Very Vanilla, DP is SU! “Prints”
Inks: Always Artichoke, Lavender Lace, Always Artichoke Marker, Versamark, Chalks in Lavender Lace, Almost Amethyst, Bashful Blue, Not Quite Navy, Always Artichoke, Old Olive
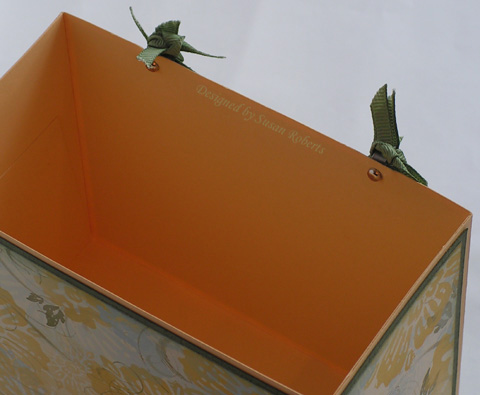
Accessories: Black Embossing Powder, Rhinestones, Prima, Very Vanilla Taffeta Ribbon, Ticket Punch

**These little baskets were designed using a folding technique from a card in my mother’s vintage collection. It was a Hallmark Historical Collection card and was a reproduction of a card printed in the late 1800’s by Raphael Tuck & Sons, London.**

Lori Craig has organized a Bible Verse Challenge over on Splitcoaststampers. “We’ll each create an on-going altered journal, rolodex card, scrapbook page, ATC or recipe card project… Each month we will choose a verse and get to stamping. We’ll add that piece to our collection.” Here is my first scripture card, the storage box and dividers.

blog36bvc08withwm.jpg

Isn’t this a wonderful idea and challenge! I am just now joining in for the month of April. I plan to make this more than just a year long project.. perhaps a life long project. The scripture card hangs from the picture hooks in plain view all month. As I create the next month’s card, I will simply take the old one off from the hooks and file it under the month in which I created and memorized it. It will be easily available if I choose to refer back. Oh and another easy change each month could be the ribbon around the hangers. Thank you, Lori, for such a meaningful and awesome challenge!!

The finished box measures 5-3/4″ wide X 4-1/2″ tall X 3″ deep. Each scripture card measures 4″ X 5-1/4″. The center of the holes for the eyelets on the scripture card are 5/8″ from the top and 1″ from the side of the card.

The holes for the brads are placed 1/8″ from the top and 1-1/4″ from the side fold on the box.

blog36boxflatwithwm.JPG

blog36bvctemplatewithwm.jpg

blog36hookbradswithwm.jpg

These are just the regular inexpensive picture hangers that measure 7/8″ in length. The holes for the brads are placed 1/8″ from the top and 1-1/4″ from the side fold.

blog36boxinsidebradswithwm.jpg

blog36boxfilecardswithwm.jpg

Each divider card measure 4-1/2″ X 5-1/2″ not including the tab.

Box and File Cards
Stamps: Full Calendar, Sanded
Paper: So Saffron, Always Artichoke, SU! DP “Le Jardin”
Ink: Always Artichoke
Accessories: Tab Punch, Brads, Picture Hangers, GG Ribbon or Organdy Ribbon

Scripture Card:
Stamps: A Light Unto My Path, Carte Postale, French Flair
Paper: So Saffron, SU! DP “Le Jardin”
Ink: Not Quite Navy, So Saffron, Jet Black Stazon
Accessories: Jumbo Pewter Eyelets, Crop-A-Dile, Rhinestone

© COPYRIGHT © and FTC Declaration

All content on my blog is COPYRIGHT © 2008-2024 Susan Roberts. Please don't copy any of my stuff for publication, design or contest submission. I declare that I sometimes promote and/or endorse products that I currently receive or have received either for free or at a discount. That said, I won't ever recommend anything that I don't personally enjoy using or feel is a quality product.
© 2020 Rainy Day Creations Suffusion theme by Sayontan Sinha